Understanding how a portable air conditioner window kit really works
A portable air conditioner only performs well when the window vent is sealed properly. When the exhaust hose leaks hot air back into the room, the unit runs longer, wastes energy, and your electricity bill climbs. Think of the window kit as the pressure door on a submarine: any gap in the window seal lets outdoor heat and infiltration air undo your cooling.
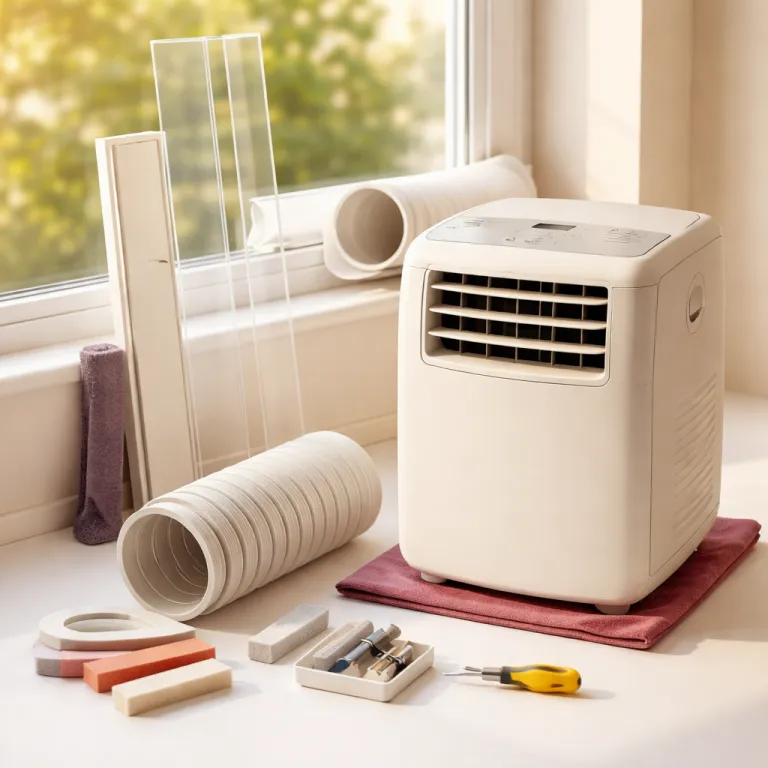
Most portable air conditioners ship with a basic plastic window kit that slides to fit a typical sash window. The kit usually includes one or two panels, a round exhaust hose connector, foam strips to seal the window, and sometimes a lightweight, easy-to-misplace screw set. Before you install anything, read the manual for your specific portable unit and check that the product parts match the diagram, because missing pieces or the wrong hose diameter (commonly around 125–150 mm, or 5–6 inches) will stop you getting a perfect fit.
The core job of the window insert is simple but unforgiving. It must hold the exhaust hose firmly, block hot air from reentering, and fit the window without bending or rattling. If the supplied portable window kit does not match the window dimensions in your apartment, you will need either an extension panel, a custom insert, or a different portable air conditioner unit entirely.
Basic tools and parts checklist: tape measure, pencil, screwdriver, scissors or utility knife for trimming foam, the supplied window panels, hose connector, exhaust hose, and optional extras such as additional weather stripping, a tension rod or sash stop, and non-marking pads for the portable unit wheels.
Measuring your window before you install the kit
Everything about how to install a portable air conditioner window kit starts with a tape measure. Standard sash windows that slide up and down are the easiest, but narrow frames under about 56 centimeters often expose the limits of so-called universal kits. Measure the width of the window opening, the height of the movable sash, and the depth of the track where the kit will sit (from the inside edge to the outside stop), then write those numbers down before you unpack the portable air product.
For a sliding window that moves side to side, you will mount the window kit vertically instead of horizontally. In that case, measure the full height of the opening and check whether the supplied panel extends to at least about 200 centimeters, because many portable units ship with shorter panels meant for smaller windows and patio doors. If the panel does not reach, you can often add a compatible extension kit or use a separate bracket system designed for portable air conditioners and window AC units, which you can research further with a detailed guide on how to choose the right bracket for AC window units and portable air conditioners.
Casement windows that crank outward and louvred windows with angled glass slats are the real stress test for any portable air conditioner window kit. A typical horizontal insert simply does not fit window openings that are tall and narrow or broken into multiple blades. When your casement window or louvred frame refuses to cooperate, you will need to plan a custom insert or consider a different portable air conditioning approach rather than forcing a kit that clearly does not fit.
Fast 10 minute install on a standard sash window
On a classic sash window, the installation can genuinely be easy and fast. Start by opening the window, placing the adjustable plastic insert on the sill, and sliding the panel sections until they fit the width of the window opening. Once the kit matches the frame, tighten any locking screws so the window vent panel cannot collapse later when the portable air conditioner exhaust hose pulls on it.
Next, apply the supplied foam window seal along the bottom edge of the sash and the sides where the plastic meets the frame. This compressed foam creates the airtight barrier that keeps hot air outside and stops infiltration air from sneaking around the insert. Lower the sash gently onto the window kit, press along the edges to improve the seal, and if the panel still shifts, add a simple tension rod or sash stop above it to keep the unit locked in place.
Now attach the hose connector ring to the circular opening in the panel and twist the exhaust hose from the portable unit into place until it clicks. The connection should feel snug, not wobbly, and the hose should run in a smooth curve rather than a tight bend that restricts air flow. When you power on the air conditioner, check with your hand around the window and hose joints for any warm drafts, because even a small leak can cut several degrees off the effective cooling of a 10 000 BTU portable air conditioner.
Step-by-step sash window summary: (1) measure opening width and track depth, (2) adjust and lock the panel to size, (3) apply foam along contact edges, (4) close the sash onto the insert, (5) fit the hose connector and attach the exhaust hose, (6) brace the panel if needed, and (7) test for leaks and rattles while the unit runs.
Casement, sliding and louvred windows: when the universal kit doesn’t fit
Urban renters often face casement windows or sliding patio doors that make a standard portable window kit look laughably small. For casement windows, the most reliable method is to create a clear acrylic or plexiglass insert cut to the exact opening size when the window is partially closed on the frame. You then cut a circular hole for the exhaust hose connector using the manufacturer’s template or the outside of the connector ring as a guide, add EPDM gasket tape around the edges, and clamp the insert in place so the casement can still lock without crushing the kit. A simple line drawing or photo of this plexiglass panel sitting in the opening, with the hose passing through the cutout, can make the layout much easier to copy.
Sliding doors need a tall vertical window kit panel, usually around 200 to 210 centimeters, that runs from the bottom track to the top of the frame. The weight of the panel should rest on the bottom track, while foam weather stripping seals the sides and top to stop hot air from leaking back into the room. Because the opening is large, any gap at the top becomes a chimney for warm air, so take extra time to fit window edges tightly and consider a purpose-built long tail window kit system, such as those explained in depth in a guide on how the Coolzy long tail window kit enhances your portable air conditioner experience.
Louvred windows are the hardest case, because the glass slats tilt and leave multiple gaps that a single insert cannot easily seal. You can sometimes mount a small plexiglass panel behind the louvres and close them against it, but the result often does not fit well and leaks badly around the edges. In many apartments with large louvred sections, the honest answer is to vent a portable unit through a different window or wall opening, or to use a different type of air conditioning product that does not rely on a traditional window vent at all.
Quick measuring guide for tricky windows: note the maximum opening height, the minimum width you can safely close down to, and the depth of any recess where an insert will sit. Mark hinge clearances on casement frames so the hose and panel do not foul the hardware when you open or lock the window.
Sealing, safety and landlord friendly installation details
Once the window kit is in place, sealing the gaps is where performance is won or lost. Use compressed foam weather stripping around every edge where plastic meets frame, and avoid relying on duct tape which degrades in heat and leaves adhesive residue that landlords hate. A well applied window seal not only keeps hot air out but also reduces noise and vibration from the portable air conditioner unit.
For renters, a landlord-proof install means no new holes drilled into the window frame and no permanent brackets screwed into the wall. Instead, use removable sash stops that reuse existing screw holes, tension rods that press between the frame sides, and non-marking foam pads under the portable unit wheels. This approach keeps the install easy to reverse at the end of the season while still giving the exhaust hose a stable, perfect fit in the window insert.
Safety matters as much as cooling, especially with heavier 12 000 BTU portable units that move between rooms. Many 10 000 to 12 000 BTU models weigh roughly 25–35 kilograms, so roll them carefully and avoid lifting alone. Make sure the hose has enough slack that it does not pull the window kit out of the track when you move the unit, and avoid extending the exhaust hose beyond the manufacturer’s recommended length, which is often only about 1.5–2.5 meters, because extra bends trap heat. Plug the unit directly into a properly grounded 120 V or 230 V outlet (as specified on the rating label), keep the cord away from the window track, and do not run the exhaust hose near flammable materials. If the supplied hose feels flimsy, some customers upgrade to a better insulated exhaust hose product, but always match the diameter and use the correct hose connector so the portable air conditioning system can vent freely.
End of season removal, storage and long term performance
When the heat finally breaks, taking the time to remove the window kit correctly will save you frustration next year. Power off the portable air conditioner, let the exhaust hose cool, then twist it free from the connector and cap the opening on the unit if a cover is supplied. Carefully lift the sash or sliding window, pull the insert out without bending it, and peel away the foam window seal in long strips so you do not leave small pieces stuck in the track.
Store the plastic window kit, hose, and hose connector together in a flat box or the original packaging if you still have it. Keeping the insert flat prevents warping, which is a common reason a previously perfect fit suddenly does not fit the window the following summer. While you are packing things away, clean the air filters on the portable unit and, if you also run a window air conditioner in another room, consider reading a detailed guide on how to choose the right replacement filter for your window air conditioner so both systems stay efficient.
Before the next cooling season, inspect the exhaust hose for cracks, the foam for compression, and the plastic for any damage from UV exposure. Replacing a tired window seal or a brittle hose on a BTU portable model costs far less than running an inefficient system that leaks hot air all day. The portable units that still feel strong after several summers are usually the ones whose owners treat the window vent kit as critical infrastructure rather than an afterthought.
Key figures on portable air conditioner window performance
- Industry testing on portable air conditioners suggests that poor window sealing can reduce effective cooling capacity by roughly 10 to 20 percent compared with the rated BTU output, because infiltration air and hot air recirculation force the compressor to run longer for the same temperature drop. These values are typical ranges drawn from manufacturer data and lab-style comparisons rather than a single universal standard.
- Field measurements in small apartments of around 25 square meters indicate that a properly sealed exhaust hose and window kit can lower indoor temperatures by about 4 to 6 degrees Celsius more than a loosely installed kit during peak afternoon heat, especially in rooms with west-facing windows. Actual results vary with insulation, sun exposure, and local climate.
- Energy comparisons on portable units with single-hose designs show that dual-hose models can cut cooling times by up to around 30 percent in similar conditions, largely because they reduce the negative pressure that pulls warm outdoor air through window and door gaps. Independent consumer testing organizations and manufacturer literature both report similar order-of-magnitude improvements.
- Consumer testing organizations commonly report that many so-called universal window kits only adjust between roughly 56 and 102 centimeters, which means that narrow sash windows and tall casement windows often require either extension panels or custom inserts to achieve a safe and airtight fit. Always confirm the exact adjustment range in the product specifications.
- Noise measurements taken at a distance of 1 meter from typical 10 000 to 12 000 BTU portable air conditioners show sound levels around 50 to 60 decibels on low fan speed, but poorly sealed window vents can add several decibels of rattling and whistling that disappear once the kit is properly braced and sealed. These sound levels are approximate and depend on the specific model and room acoustics.
Note: The figures above are typical ranges drawn from manufacturer data, lab-style comparisons, and consumer test summaries; actual performance will vary with room size, insulation, climate, and how carefully the window kit is installed.
FAQ: portable air conditioner window kits and installation
How do I know if my portable air conditioner window kit will fit my window ?
Measure the width or height of the opening, depending on whether your window is a sash or sliding type, and compare it with the adjustment range listed in the kit specifications. Most standard kits fit openings between about 56 and 102 centimeters, so very narrow sash frames and tall casement windows may fall outside that range. If your measurement is close to the limit, plan on using extension panels or a custom insert rather than forcing a panel that clearly does not fit.
Can I use a portable air conditioner with a casement or louvred window ?
Yes, but you usually cannot rely on the stock horizontal window kit that ships with the unit. For casement windows, a custom plexiglass insert with a cutout for the exhaust hose is the most secure and efficient option, sealed with gasket tape around the edges. Louvred windows are more difficult, and in many cases it is better to vent the portable unit through a different opening or choose an alternative cooling product that does not depend on a traditional window vent.
Is it safe to extend the exhaust hose to reach a distant window ?
Extending the exhaust hose beyond the manufacturer’s recommended length is not advisable, because longer runs and extra bends increase back pressure and heat buildup. This can reduce cooling performance, raise energy use, and in extreme cases stress the compressor inside the portable unit. If the nearest window is far away, consider relocating the unit closer or using a model designed with a longer venting system rather than improvising with extra hose sections.
How can I avoid damaging my rental when installing a window kit ?
Focus on reversible methods that do not require drilling new holes or using permanent adhesives on the frame. Use foam weather stripping for the window seal, tension rods or removable sash stops for bracing, and non-marking pads under the portable air conditioner wheels. When you move out, remove the kit, peel off the foam, clean the tracks, and reinstall any original hardware so the window looks unchanged.
Why does my room still feel warm even though the portable AC is running ?
If the room stays warm, the most common culprit is a leaky window vent or a loose exhaust hose connection that lets hot air spill back inside. Check the edges of the window kit for gaps, make sure the hose connector is tight, and feel for warm drafts around the frame while the unit runs. Improving the window seal and reducing hose kinks often makes more difference than upgrading to a higher BTU portable model in the same space.
What should I check first if I notice leaks or rattling noise ?
Start with a quick troubleshooting checklist: confirm the panel is locked to the correct length, press along the edges to find loose foam or missing weather stripping, straighten any sharp bends in the exhaust hose, and tighten the hose connector ring. If rattling continues, brace the panel with a sash stop or tension rod and add thin foam pads where plastic touches the frame to absorb vibration.